Hello guys! We code ios every day, and surely many young people like us rarely check the memory of the app when using it to find out the unusual problems of the app. In today's example, we're going to create our own leak to understand what it is, instead of listening to you finish reading and not understanding anything.
Demo image:


First you download the source code here:
https://github.com/codetoanbug/LeakMemorySamples.git
The code is in branch bai1 so you need to switch the source to this branch. To switch to the following pink section:
However, I recommend playing with the Terminal of the MacBook for it pro. Because if you download vegetarian using the browser, you do not see where the source code is :v
The simple terminal is as follows:You typed
the cd command into the source code the previous day you downloaded:cd LeakMemorySampl
e2. Next is to type fetch to get my latest source code about:git fetch
3. Next is you show the entire branch on my repo with the command: git branch -a Here you
will see the following branch:bai1 *bai2 masterExamples
this article, I put all the source into the branch named bai2. You switch to the source code lesson 2 as follows: git ch
eckout bai1 After branch bai1 is boldly colored, you have succeeded already. And if it doesn't show you're wrong, do it again!
I'll explain it piece by piece.
- First screen: ViewController.
I was lazy so I took the default file created by Xcode. You go to the Main.storyboard file to see how I drag and drop 😂
This screen has nothing, apart from a web logo photo, a button to open to the second screen, where leak memory is contained.
2. 2nd screen: SecondViewController.
This screen code is as follows:

I explained the code above:
Line 19 – I call bindViewModel to connect viewmodel to view. I like making MVVM for code clean. So if you don't understand what MVVM is, please find the MVVM tag on this web to understand more.
From line 23:
I created viewModel here. In line 27, I have a closure function. What does this function do? It contains code 28(or 29) that resets the color of the background. Like him, I'm commenting on the 27th line behind me, and line 28. If you don't know anything about closure, then understand that it is a jaw that runs at some point from the model view. It's not going to run right now. It's like you create a schedule, that if your lover kisses you, you do something 😘 Kiss here is the needClosure function, and doing something is line 28(or 29).
Line 33, I create a fake request API function, have a delay time, and finally assume that when there is a result, it will call the closure I said above.
So what do I have in viewModel? Follow the following code:
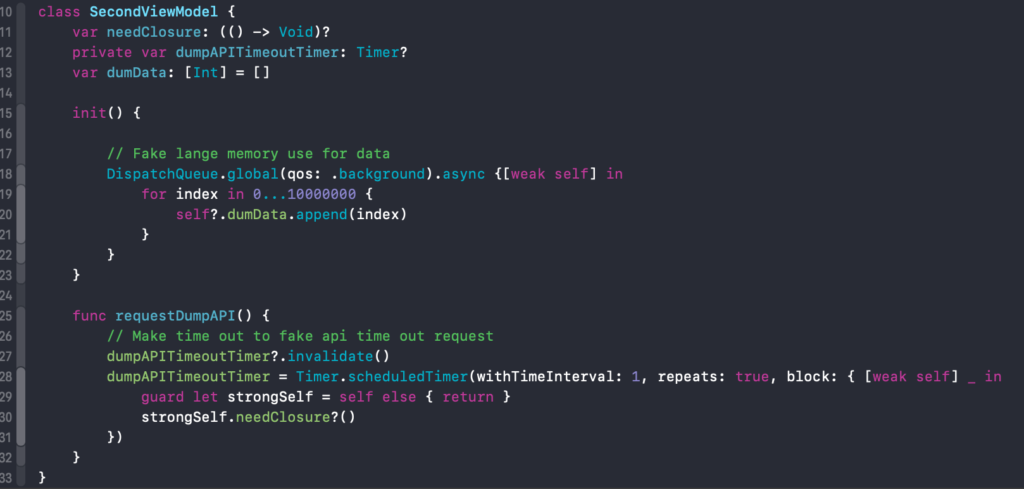
In line 11, I create a closure variable to shoot the event out when the API has the result returned.
Line 12 I created a fake timeout timeout of the API.
Line 13 I created a variable that saves the data inerger array.
Lines 18 to 21, I try to create a lot of data that takes up memory to show you how disastrous it will be when we don't release it. I pushed it into the background thread so as not to block the main thread when you try to open SecondViewController.
Lines 25 to 30, I create fake 1 API call function. This function returns the result after 1 second. When the results come in, he'll call the closure variable to shoot out the SecondViewController. SecondViewController will perform the color change.
OK, so you already understand the flow of the app. So the next thing is to keep track of how it's been done.
First you run the app and see the memory used as pictured:

You click the Open Second screen button, then wait a moment for SecondViewController to create data, and then click Back to Level 1. Just do so seven times, you will see one thing is that the memory only increases without reduction.
Congratulations on creating a successful leak memory.
So why is it leaking memory?
Back to the closure code below:

Here I use a strong link from viewModel to view controller, by taking self.view. That means this ViewModel was only really canceled when SecondViewController was destroyed. However, this ViewModel is the son of SecondViewController. If SecondViewController wants to cancel, it means he has to cancel first. Oh, so I said you canceled it, and I just canceled it, and you told me I canceled it before you canceled it. In the end, 2 guys take no one, the memory is still there, never freed.
It's very simple, isn't it?
So how to fix it? We proceed to revise the above code as follows:
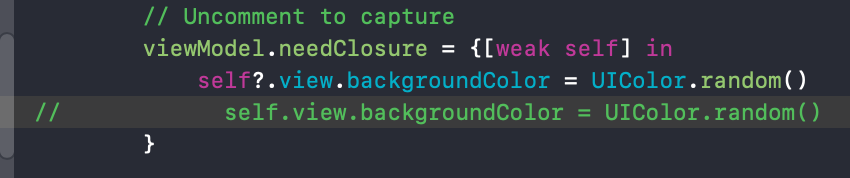
I proceeded to capture for the upper closure function. Oh, what is it? You're simply telling me dad when you get closure back, if you're still living there, I'm going to set you a color! And I'm open(liberated when I press back) then stop assigning. I create captur[weak self]e to create a weak link for that. Then the code in the closure will be self?. instead of self. It's simple, isn't 😍
Then the following function will print the words "free memory SecondViewController"
deinit {
        NSLog("free memory SecondViewController")
    }
From now on, every time you create a new view controller, add the deinit function and put the debug in it, see if it has been freed? If you have cancelled the controller view, there is no leak memory in it. If you don't print it, surely leak memory.
So I've finished presenting the case for leak memory at closure. Through the example, hopefully you will be more careful in your coding. The app runs but must run smoothly.
Hope you enjoy it!
I have to admit this content was very worthwhile. I discovered you with a google search and was rather stunned at your rank for this article.
thank you. if you have any question, please comment below this post.